After sewing quite a few face masks, I felt that my sewing machine deserved a little reward for such a daunting task, as well as some well deserved maintenance.

For the little reward, I will admit that it is something I have been dreaming of, since I got this machine. Oh! do I love my machine, a Singer 15K from 1923! However I always thought that all its glory would be undoubtedly surpassed by the replacement of its slightly, dull black face plate by a shinny, carved new one!
You will instantly realize that my own vanity was in play here but since my birthday is coming, I thought I deserved such gift too! 😉
Will my machine appreciate this replacement? Will she wear it proudly like I wear a new necklace? Will she instead see it as an unnecessary face lift which would imply that her beauty had to be improved? No, no, I’m sure she will like it! I’m sure she will feel utterly special to have such a perfect addition!
At this point you may think I’m a bit crazy so I will confirm it by saying that I do believe old machines like my Singer have a soul. If you’ve read the story on how we met, you may start to realize how fate brought us together and if you read the rest of the story, you will learn how we got acquainted and started to appreciate each others… Yes I am crazy indeed!
Anyway, now that we got the crazy part out of the way, let’s see the how to replace the face plate and how to service a vintage sewing machine.
How to replace the face plate
First I must say that I didn’t realize that this was going to be a face plate replacement. I thought the shinny face plates were cover ups for the otherwise closed area of the machine. But as it turns out, it is not a closed area, at least not permanently closed one. On the contrary, it is easily accessible for cleaning, maintenance and part replacement as and when needed! This is really for the best as it gave me the occasion to clean a part of the machine I had not yet cleaned, and the great opportunity to show you what’s hiding inside and how it operates! How marvelous!
How do you remove the existing face plate of your machine? Actually, there is just one little screw holding the plate in place. A little bit of modern WD40 lubricant was required to help the process, as well as a little bit of my partner’s strength. After that, the face plate came out easily, with the tension mechanism attached I must confirm.
I therefore feel like a ‘how to replace the face plate’ was a bit of an unnecessary part of this piece. But I suppose that confirming a single screw has to be untighten is somehow a useful information, if you thought of replacing the face plate on your machine, and were hesitant.
Now, one maybe more important piece of advise: be extra careful when purchasing a face plate. Not all seller know what they are selling and precisely which machine the face plate they are selling will fit. Same goes for attachments and other parts.
It isn’t the case for all Singer models but for my 15K, the tension mechanism is attached to the face plate. It is detachable, like all other parts, but I didn’t want to take the risk of not being able to install it back on a ‘new’ face plate so I bought one with a ‘new’ tension mechanism. So far so good, it seems to work wonders. More test are required to confirm.
This is however a particularly important point overall, especially if you wish to keep your machine historically correct.
My ‘new’ face plate might not be the same age as the old one. It might be more ‘modern’. My machine is from 1923, maybe the face plate is from the 30’s? Not quite sure of the date but I thought I should mention. The same goes for the zigzagger attachment I bought and which dates from 1954.
To me, isn’t an issue. My general feeling about it is that, when you bought a machine like a 15K in 1923, you most likely were still sewing on it in 1954 and beyond! So, having slightly more modern pieces or attachments is part of the cycle of a Singer wonderful life. Having said that I obviously still do not buy things for it, that are not vintage. Like at least 50-60 years old vintage!
Anyway, this transgression was mostly important if you want your machine to stay historically correct. Otherwise, carry on…
Servicing a vintage sewing machine
Cleaning and oiling is usually all that is needed. But it needs to be done in all areas and yes, even in places you might not expect at first, like the one behind the face plate!
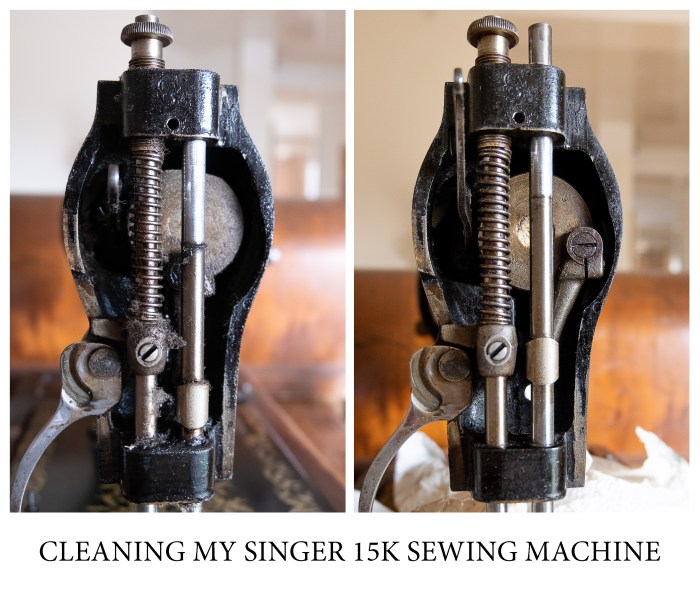
Some cleaning
As you can see on the picture below, cleaning behind the face plate was indeed required on my machine!

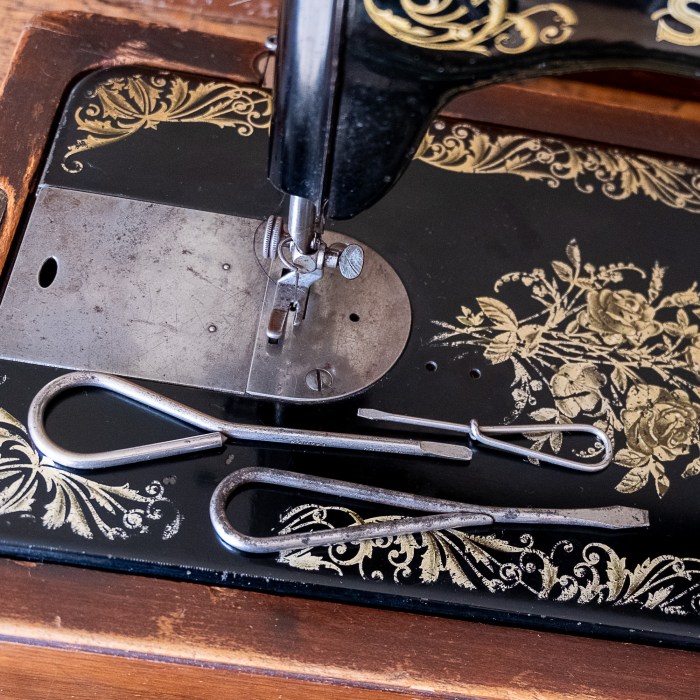
Fluffs, bits of threads and muck have to be remove. You can use which ever tools you have to do so very gently. Toothpicks, interdental brushes, Q-tips… You do need screwdrivers of different sizes. And some very gentle metal polish if you have.
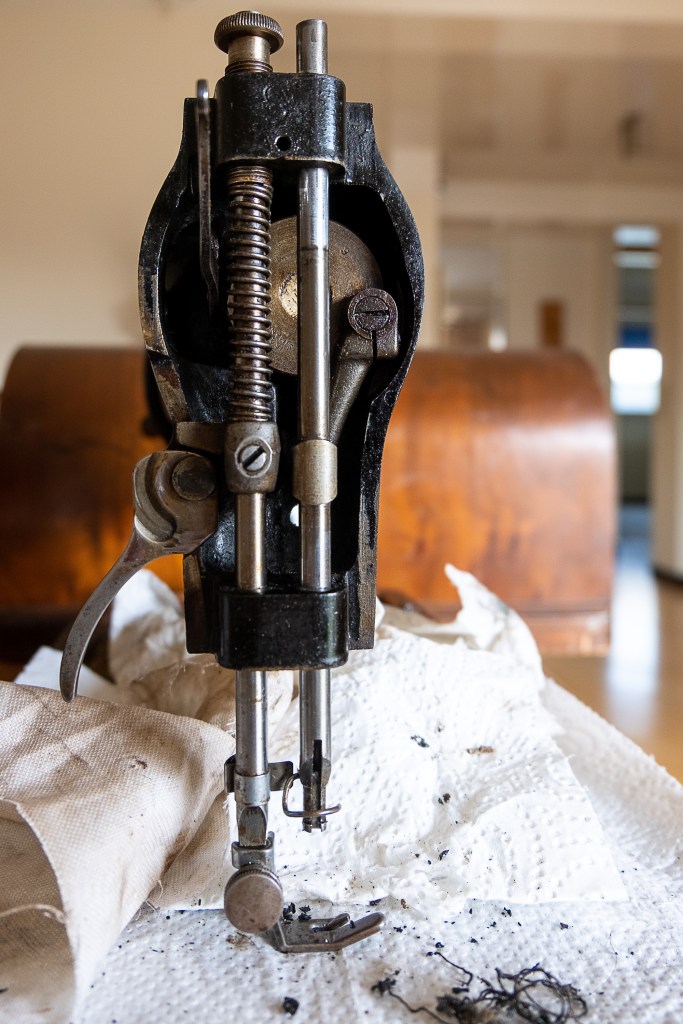
A bit more WD40 here, some elbow grease there, and voila! Yes I had removed the needle to do this. Needles are precious fragile little things after all.

I do need to do slightly better on the presser foot spring and axle, but with time and further maintenance, their condition will improve.
The pictures show the before and after cleaning behind the face plate but you need to do the same in all areas. Around the bobin is particularly important. I removed a quantity of bits of thread that was mind blowing, the first time I did!
Oiling done right
The instruction manual of the machine gives information on everything you need to operate & maintain your machine. The most important maintenance required is proper oiling and the manual says that if you use your machine daily, it needs to be oiled daily.
It is magical how a tiny drop of oil can change everything!
It so happens that the manuel of my 15K does mention unscrewing the face plate and moving it, to oil the shuttle race. I had just not paid enough attention! Shame on me for oiling it from the top!
If you do not have the instruction manuel for your machine, try to find it. These manuals, are, with a bit of Google magic, fairly easy to find online for free (although some people do sell them).
If you don’t know the model of your machine, fear not, that is an easy mystery to solve with the ISMACs data base.
But if you don’t have time for any of this, do the following:
1- put a drop of oil in every little holes there is in the machine body.
2- look at your machine in action and add a drop of oil on the moving parts that you see.
3- raise your machine and put a bit of oil on the moving parts underneath.
So basically put a bit of oil everywhere 2 metal parts are in action.
That should do for most of it!
Needless to mention that the oil to be used is for sewing machine, not the one for your car, your bike or your fritters.
Additional tip: add something absorbant below your machine. You may see in the video below, I used a fairly thick green felt piece. The felt absorbs the excess oil and protect the wood case of my machine.
And finally it was time to install…
My ‘new’ face plate!
Here it is in all it’s glory, shine and beauty!
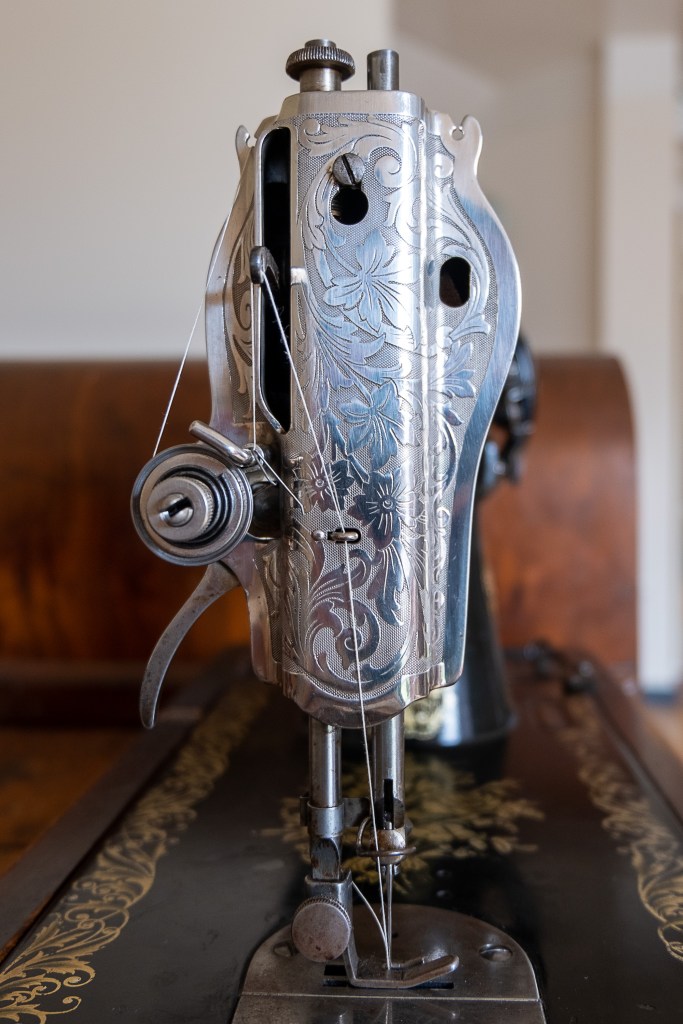
How marvelous is that?
How gorgeous it is!!
You may not be as mesmerized as I am but, come on, it’s fantastic isn’t it?!
Yes, I got the back cover plate too! How could my machine not appreciate such a jewel ensemble! She was marvelous before, and is simply exceptional now.
Now, on to the next sewing project!

*****
Don’t want to complain again about untrustworthy sellers, but quite a few do not have any idea what they are selling and unfortunately, some are not trustworthy and intentionally misleading. My buttonholer purchase could have been a disaster, if I had not been 100% determined to make it work.
If you learn anything from such stories, it could also be that you really need to clean first and oil second! And don’t let the oil dry up for 80 years!
Want to see the inside of the beast in action?
Try and play the video below. Not sure it will work though! sorry in advance if it doesn’t!
Pin this if you can! and if you like it, etc. etc.


This Is A Amazing Sewing Machine. I have the Honor of owning three of the 15-91’s. And a 201-2, a Beautiful Sewing Machine. Besides my other sewing machines, have a small Vintage collection of Singer’s, Love’em💖💖💖 !!! Thank you for your Kind Help…
LikeLike
Absolutely love reading this. Both my wife and self are addicted to these old machines. She has numerous new ones, top of the line semi pro models but to be honest they are all rubbish and the construction miserable. Plastics start degrading, belts stretch throwing the timing off etc etc. They are also designed to be serviced by professionels….at great cost these days. I think between 80-120 euros here in France plus any bits you “mght” need. We run a Singer from 1955 a 15K converted from a treadmill to electric and boxed. It is a beautiful machine and my wife uses it now as her primary sewing machine. We also have another couple that I have restored including an old 1923 hand crank 3/4 size “portable” model with the floral patterns. Amazing machines…..I love working on them and my wife loves using them!
LikeLike
i appreciate yuor description and your story very much
piet erkens chilliwack 24 june 24
LikeLiked by 1 person